Last updated on March 7th, 2023 at 01:19 pm
There are hundreds of IDE( Integrated Development Environment) or code editor available in the market for python language. These are available freely or may come at a price. Today, we will setup one such popular editor and probably one of my favourite editor “Visual Studio Code”.
By the end of this tutorial, You will see that how a common community editor can be converted into fully fledged professional grade IDE for python language and with all the features like Code completion, Git history manager, Linting, Formatting, and Unit testing at your disposal.
We will be using Ubuntu 18.04 for our desktop. But you can follow this tutorial for any other OS too.
Here are the steps for Setting up Visual Studio Code:
- Downloading Visual Studio Code
- Opening python project in VS Code
- Creating virtual environment for project
- Installing Visual Studio Extensions available for Python language:
- Python
- Gitlens
- Editorconfig
- Downloading flake8 and black packages from pip.
- Enabling flake8 and black in VS Code editor
- Install flake8 from pip
- Install black from pip
- Setup auto formatting on save
Download Visual Studio Code
First step is to download VS Code for your operating system. For Ubuntu, you can download the latest version of VS Code from https://code.visualstudio.com/download
Now, Open terminal and run command:
sudo dpkg -i /path/to/code_downloaded.deb
Open python project in VS Code.
Once, VS code is installed. We need to open python project in VS code. For the sake of completion of this project, we will create a new project directory and open newly created project in VS Code.
mkdir myproject
cd myproject
code .
This will open a newly created directory in VS code editor.
Create virtual environment
Virtual environments in python is way of maintaining separate dependency libraries for each project. This way you can avoid a lot of project version conflicts with each other.
Since Python 3.8+ (I guess), you have a provision to create a virtual environment inbuilt into the python. To create a virtual environment enter this command in terminal in your project directory.
# this should be executed in project root directory
python3 -m venv venv

# Above command will create a venv directory in your project directory
# Now, activate virtual environment
source ./venv/bin/activate
Once the virtual environment is created, we will create a python file in the project. create a file app.py and write this string and save it.
print("Welcome to the Visual Studio Python setup tutorial. This is a long string that should serve later in this tutorial")Install Visual Studio Extensions
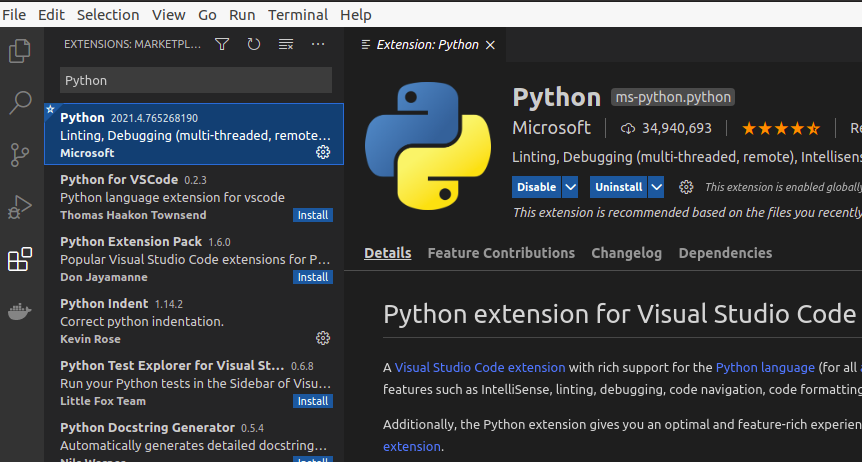
Now, our project is created, we need a few language specific extensions for Python in VS Code. Extensions enhance the capabilities of a typical IDE and give you various tools to support your development. To download extensions, you can click on extensions icon available in leftmost panel or you can open Extensions window by typing (Ctrl + Shift + P) and enter “install extension”. Here is the list of VS Code extensions that we need to have for our project.
Python extension
This is by default provided by Microsoft (maker of VS Code) and is the core of Python development on VS Code. You can install Python plugin from extensions from left panel as shown below
Editorconfig
EditorConfig helps maintain consistent coding styles for multiple developers working on the same project across various editors and IDEs. Again It’s an optional plugin but I highly recommend it to make few editor level configuration changes.
To install EditorConfig, Open Extensions window from left pane or type (Ctrl + Shift + P) and enter “install extension”. In the extensions panel (left), search for “EditorConfig” and then install it. Here is sample .editorconfig file:
root = true

[*]
charset = utf-8
end_of_line = lf
insert_final_newline = true
trim_trailing_whitespace = true

[*.{py,rst,ini}]
indent_style = space
indent_size = 4

[*.yml]
indent_style = space
indent_size = 2
Gitlens
Git is a source code management software(SCMS) and helps us in tracking the project versions. We do not require this step for the post but there is no professional software that is not maintained by some kind of SCMS.
Gitlens is a cool extension to see history in a fun way. It will provide you line by line history within the editor only. No need to run any additional commands.
Enable flake8 and black in VS Code
Linting is the process of checking code for programmatic and stylistic errors. In python, there is no curly braces to enclose functions, classes etc. So it becomes very much important to enable linting by default and catch these errors beforehand.
Flake8
This is a linting library that will help you to identify code issues within the editor.
To download flake8 using pip install flake8
Once downloaded we need to create .flake8 in our project root directory to enable Flake8. You can read more about flake8 from official documentation.
[flake8]
max-line-length = 88
extend-ignore = E203
This will show all the Linting errors in red like below:

To remove this error write the following and save the file.
print(
    "Welcome to the Visual Studio Python setup tutorial. This is a long string that "
    "should serve later in this tutorial"
)
There should be no formatting error now.
Here are the steps for Windows
If you face any issue in activating your virtual environment of python project in vscode and getting error like
venv\Scripts\Activate.ps1 cannot be loaded because running scripts is disabled on this system
Then perform the following operations
Open the windows powershell in administrator mode

Execute the command:
$ Set-ExecutionPolicy Unrestricted -Force
Black
Black is a python formatter that will greatly help you to automatically fix 99% of formatting issues.
To download black using pip install black
Once downloaded you can enable auto formatting in VS Code on saving the file (Ctrl + S).
- To enable auto formatting use (ctrl + ,)
- On settings window pane search for “format on save” mark it enabled (check screen below)

- Next is to set black as default formatter Search “Python formatting provider”

Now, as soon as you save any python file. VS Code will try to reformat document in best possible manner it can. Just to give you an example. Try to paste following code in app.py file and then save. All the undesired spaces will be removed (Notice space between print and parenthesis).
a = False
if a is True:
    print ("Hi")
Finally, if you still running into trouble of VS Code complaining about flake8 not found. Make sure virtual environment is activated and you’ve installed all the libraries correctly.
Here is the project structure created so far.
In my next post, we will be adding some more functionality to enable debugging and will learn about writing test cases in python project. Hope it helps. Cheers!
Discover more from kumarvinay.com
Subscribe to get the latest posts sent to your email.